#Convert Document to HTML
Explore tagged Tumblr posts
Visit Tumblr Blog
Explore Tumblr blogs with no restrictions, modern design and the best experience.
Last Seen Tumblr Blogs


Fun Fact
Tumblr has been providing a Korean-language service since 2013.
Note
ao3 has a Google docs posting script?
Yes! You can find it here.
If you use Google Drive to work on text-based fanworks, you might have run into formatting issues when copying from Google Drive to our Rich Text Editor. In particular, italics and bold text do not carry over correctly when copy-pasting text. To solve this problem, Min has created a script for Google Drive that will take your finished work and convert all basic formatting into HTML for you. You can find it in this example document for posting to AO3.
98 notes
·
View notes
Text
Twine/SugarCube ressources
Some/most of you must know that Arcadie: Second-Born was coded in ChoiceScript before I converted it to Twine for self-publishing (for various reasons).
I have switched to Ren'Py for Cold Lands, but I thought I would share the resources that helped me when I was working with Twine. This is basically an organized dump of nearly all the bookmarks I collected. Hope this is helpful!
Guides
Creating Interactive Fiction: A Guide to Using Twine by Aidan Doyle
A Total Beginner’s Guide to Twine
Introduction to Twine By Conor Walsh (covers Harlowe and not SugarCube)
Twine Grimoire I
Twine Grimoire II
Twine and CSS
Documentation
SugarCube v2 Documentation
Custom Macros
Chapel's Custom Macro Collection, particularly Fairmath function to emulate CS operations if converting your CS game to Twine
Cycy's custom macros
Clickable Images with HTML Maps
Character pages
Character Profile Card Tutorial
Twine 2 / SugarCube 2 Sample Code by HiEv
Templates
Some may be outdated following Twine/SugarCube updates
Twine/Sugarcube 2 Template
Twine SugarCube template
Twine Template II
Twine Template by Vahnya
Sample Code and more resources
A post from 2 years ago where I share sample code
TwineLab
nyehilism Twine masterpost
How to have greyed out choices
idrellegames's tutorials
Interactive Fiction Design, Coding in Twine & Other IF Resources by idrellegames (idrellegames has shared many tutorials and tips for Twine, browse their #twine tag)
How to print variables inside links
How do I create a passage link via clicking on a picture
App Builder
Convert your Twine game into a Windows and macOS executable (free)
Convert your Twine game into a mobile app for Android and iPhone (90$ one-time fee if memory serves me right) // Warning: the Android app it creates is outdated for Google Play, you'll need to update the source code yourself
252 notes
·
View notes
Text
Okay so having a really quick play about with Ellipsus, loving what I'm seeing so far.
1 - FOLDERS (suck it, Google Docs). And SUBFOLDERS!!!!! (I just really love folders okay don't judge me)
2 - The draft management actually looks fantastic. Need to investigate it a little more but really impressed with that (being able to side-by-side, lock scroll, AND the merge function looks great? Being able to give them designated names??)
3 - Really easy document navigation using the headings and outline feature. The main reason I don't like doing longer documents in Word, takes a bit of a faff. This is as easy as selecting a heading and BAM done.
4 - I don't do a lot of collaborative writing but this looks like it would be amazing for that. There's comments, collaborators, but also a CHAT feature. Makes me think this could actually be good for RPs as well as story collaboration if folks wanted, especially people who like to convert RPs into stories after the fact.
5 - Exporting work looks quite easy. Buttons for PDF, rich text - and also HTML! That could be really useful for AO3. Definitely going to give that a try with my next fic.
6 - The phone UI seems pretty nice as well, which is huge for me as I love getting some words in when I can't sleep or am hanging about waiting for something.
I wish I had the brain power to actually DO some writing right now but I don't lol. Excited to give this a try though after I've had another 30 or so hours sleep.
150 notes
·
View notes
Text
BG3 Photomode Tutorial #2.5: More Scene Manipulation
Chapter 0: Overview
Chapter 1: Script Extender Debug Console
Chapter 2: Scene Manipulation
Chapter 2.5: More Scene Manipulation
Chapter 3: Otis_Inf Camera Tools
Supplement: Mods and Resources
In continuing from the last tutorial, I wanted to talk about how you find and play cutscenes. There's a couple ways to do this but I will show you my way because I think it is the most thorough way if you need to figure out what flags you may need to edit in order to get this working. It'll also give you the tools you need to troubleshoot flag settings.

In the above screenshot, you can see a cutscene that is meant to be played in the Shadowcursed lands: The cutscene where you play the Lyre to summon Kar'niss. It is a complex scene with tags to resolve and multiple NPCs - some of which aren't humanoid.
I will show you how to find a scene based on a snippet of dialog, how to locate its name and UUID so you can plug it into this command:
Osi.QRY_StartDialogCustom_Fixed("SCL_Drider_Caravan_HalfOrcCaster_865adfae-1b72-1ed2-f961-d55abd4fb7b1","S_GOB_DrowCommander_25721313-0c15-4935-8176-9f134385451b",Osi.DB_Avatars:Get(nil)[1][1],"S_Player_Gale_ad9af97d-75da-406a-ae13-7071c563f604","S_Player_Astarion_c7c13742-bacd-460a-8f65-f864fe41f255", 1,1,-1,1)
Warning: Please keep in mind, this is still a very finicky process. Again, take it slowly. And please don't be afraid to ask for help if you're struggling. Once you get the hang of it, you can pull out scenes and troubleshoot them into playing with ease.
There's also a good chance I'm glossing over something and not explaining it clearly/accurately. Please send me an ask, DM, comment to clarify anything that's confusing!
BG3 Dialog Reader
In order to do this my way, you'll need to download BG3 Dialog Reader and generate HTML files that include all the dialog of the game. There's already a very lovely tutorial on how to do this, so I recommend you follow it. EDIT: Or download their parsed files from their Google Drive: BG3 - parsed dialogue (1.7).zip
You've probably seen posts in this format before:

So you should now have HTML files located somewhere on your system. You need to search for a line that you'll find in the cutscene you want. Now you need to ask yourself: What line can I search for that is unique to that cutscene so that if I search for it I will get exactly what I'm looking for?
In the Drider-Lyre scene I recall an NPC asking "Did you bring the lyre?" so that's what I searched for. I use the Everything search tool because it's awesome and search for the file like so:

You will need to take a look at this file later, but for now, just take note of the name: SCL_Drider_Caravan_HalfOrcCaster. This is the first half of what you need to complete the first parameter in the command at the beginning. And we are going to use this to find the UUID.
Finding the UUID
To find the UUID, you're going to need another tool. The BG3 Modder's Multitool. Go to their GitHub, look along the right column and click on the link in the Releases section.

After that, click on bg3-modders-multitool.zip to download it. Extract the files to a new folder somewhere handy and run bg3-modders-multitool.exe.
In BG3 Modder's Multitool, click on Configuration and set the bg3.exe location to your Baldur's Gate 3 executable (E:\Program Files (x86)\Steam\steamapps\common\Baldurs Gate 3\bin or something along those lines). The Documents folder should auto-populate but you may want to double check it.

Now click in Search Index. It's going to start a process where it searches through the BG3 files. This can take a while the first time, but will be instant after that.

Once it's complete, you can now take the name of the scene and pop it into the new Index Search window that popped up.

In the results on the left, there will be a lot of files that list it, but I generally look for ones that say Assets\Dialogs\[PAK] and end in _merged.lsf and click on it. Then click Convert & Open.
This should open in Notepad or Notepad++. Now search this file for "SCL_Drider_Caravan_HalfOrcCaster" - keep in mind there can be MULTIPLE results. Note that the first instance you will get is SCL_Drider_Caravan_HalfOrcCaster_AtTower. This is the wrong scene.
You are now looking in the code a couple lines above that string for a value that is an ID type and has a value that's a lot of letters and numbers. This is the UUID.

So you have what you need to create this first parameter. Combine SCL_Drider_Caravan_HalfOrcCaster with the string of letters and numbers separated by an underscore. Like so:
SCL_Drider_Caravan_HalfOrcCaster_865adfae-1b72-1ed2-f961-d55abd4fb7b1
Plugging into the StartDialogCustom Command
Note that this copies straight in to this command in the first parameter:
Osi.QRY_StartDialogCustom_Fixed("SCL_Drider_Caravan_HalfOrcCaster_865adfae-1b72-1ed2-f961-d55abd4fb7b1", "S_GOB_DrowCommander_25721313-0c15-4935-8176-9f134385451b", Osi.DB_Avatars:Get(nil)[1][1], "S_Player_Gale_ad9af97d-75da-406a-ae13-7071c563f604", "S_Player_Astarion_c7c13742-bacd-460a-8f65-f864fe41f255" ,1,1,-1,1)
Now on first glance this looks pretty much like other times I've shown you this command, except note that there's FOUR actors. When a cutscene doesn't play at first (after double checking the UUID), this is very often the reason why. This is the minimum because the roles for the half-orc and Karniss need to be filled. First position is Kansif the Half-Orc, second is Tav, third is Brawler Vez, and fourth is Kar'niss.
Note: Kar'niss CAN be played by a non-Drider NPC - they will float angrily around carrying the lantern. It's hilarious. Try it. Here's when I tried it with my Tav:

Setting and Clearing Flags
Now. Depending on where and when you play this scene, the scene may or may not play or it will quit early. There could be a few reasons for that. The UUID could be wrong, the number of actors could be wrong, or a flag could be set that's not supposed to be set.
Let's have a look at the BG3 Dialog Reader file for this scene to see what flags are in use.

By default you should be able to see checkflags (blue) and setflags (orange). Look at the top of the page for a reminder of what the colors mean. The blue check flags are checking to see if the flag is set or not. If SCL_Drider_HasMet_CaravanFirstTime = False then you have met the drider caravan yet and this line will play. You will notice that after that is the orange SCL_Drider_HasMet_CaravanFirstTime setflag. That means the game will NOW set the flag as you have now met the Caravan for the first time. There may be occasions where you need to change the flags to get a cutscene to play. Here's the good news: There's handy commands for that!
print(GetFlag("flag",Osi.DB_Avatars:Get(nil)[1][1]))
Osi.ClearFlag("flag", Osi.DB_Avatars:Get(nil)[1][1])
Osi.SetFlag("flag",Osi.DB_Avatars:Get(nil)[1][1])
The bad news is you will have to find the UUID for each flag! So we gotta go back into BG3 Modders Multitool and search for the flag SCL_Drider_HasMet_CaravanFirstTime
Thankfully, you'll only get one result and the big string of letters and numbers is the UUID you need.

Now you combine them like you did with the cutscene name and UUID before, separated by an underscore: SCL_Drider_HasMet_CaravanFirstTime_39e94029-84f7-418d-ddce-8947bcbb7688
So let's say the cutscene isn't playing because you're on a save where that scene has already played. Clear the flag on your Tav: Osi.ClearFlag("SCL_Drider_HasMet_CaravanFirstTime_39e94029-84f7-418d-ddce-8947bcbb76", Osi.DB_Avatars:Get(nil)[1][1])
And I think we will leave it at that. I realize this was a LOT to cover. Go through this very slowly. It will take time to understand what is happening here.
And as always, if you have something you're trying to do and you're struggling with the directions, I can try to help! Please send me a DM, Ask, whatever else and I'll gladly help you with whatever you're trying to do.
Thanks for reading and sticking through this so far!
#okay just... if you don't know coding#take a deep breath and tackle this one section at a time - this is a lot#bg3 photomode#bg3 photography#mog's bg3 virtual photography tutorial#bg3#bg3 virtual photography#baldur's gate iii#baldur's gate 3
53 notes
·
View notes
Note
brotherwives deleted their fics :( do you know if theyre ok??
I gotta admit, this sent me into a little bit of a panic, checking for v's fic links and getting a 404. I had told myself I need to sit down and download everything in my ao3 history, and yet I didn't.
But I have good news!
brotherwives (aka qprbros, aka v) is ok. I had to check with them to see whether it's ok to say. 😅 They are still on tumblr, in a different fandom, rotating their blorbos; they just needed some space from the constant wank about their particular niche for SamDean. At this time, they don't know if they'll ever come back to spn fandom, but said it is nice to hear how we still think of them. 💜
It just got too disheartening to keep seeing the state of the gencest tag lately, so they deleted.
But on that note: v gave me a link to a zip folder of their fics! If you unzip and open in gdrive, it will load the html files into a converted document. 💜
Link under the cut (if tumblr eats it you can DM me for it)
#asks#anon ask#brotherwives#qprbros#v's fic#fic found#gencest#weirdcest#my rec list#< for organizing purposes#samdean fanfiction#weirdcest fanfiction#gencest fanfiction
136 notes
·
View notes
Text
Convert HTML to Image: A Step-by-Step Guide ✨

Do you want to turn some HTML code you've made that's on your website and have a way to convert it into an image for you to save?
Well, look no further! I too wanted to do the same thing but funny enough, there weren't any straightforward tutorials out there that could show you how! After hours of searching, I finally discovered the solution~!
This is an old tutorial I made 🐼

💛 Set your environment
Before we dive into the conversion process, I'll assume you already have your HTML code ready. What you want to learn is how to turn it into an image file. You should have a good grasp of HTML and JavaScript. For this tutorial, we'll use the following HTML code example:

We won't include the CSS code, as it doesn't affect this tutorial. The JavaScript file (script.js) at the bottom of the body element is where we'll add the functionality for the conversion.
Your page should resemble the following:

As you can see, the "Click me" button will handle the conversion. We aim to convert everything within the div.info-div into an image.
💛 Using the html2canvas JavaScript Library
The html2canvas library allows you to take screenshots of webpages and target specific elements on a screen. Here are the steps to include the library in your project:
The steps to put the library in your project:
Visit the html2canvas website for more information.
Copy the CDN link from here

and include it in a script tag in your project's head tag in the HTML file:

That's it for including the library on the HTML side. Now, let's move on to the JavaScript code.
💛 JavaScript Functionality
Here's the JavaScript code to handle the conversion:

In this code, I want to turn the whole div.info-div into an image, I put it into a variable in const div = document.querySelector(".info-div");.
I also put the button into a variable in const button = document.querySelector("button");
I added a click event listener to the button so when the user clicks the button, it will follow the code inside of the event listener!
You can find similar code like this in the documentation of the html2canvas library:

What is happening here is:
We add the div (or what the element we want to take an image of) into the html2canvas([element]).then((canvas)
Added the image file type url to a variable = const imageDataURL = canvas.toDataURL("image/png"); - You can replace the png to other image file types such as jpg, jpeg etc
Created an anchor/link tag, added the href attribute to imageDataURL
The download attribute is where we will give the default name to the image file, I added "dog.png"
Perform the click() function to the anchor tag so it starts to download the image we created
And that's it!
💛 The End
And that's it! You've successfully learned how to turn your HTML into an image. It's a great way to save and share your web content in a unique format.

If you have any questions or need further clarification, please comfortable to ask. Enjoy converting your HTML into images! 💖🐼
#my resources#coding#codeblr#programming#progblr#studying#studyblr#programmer#html#html css#javascript#neocities#coding tips#html5 tutorial#html tutorial
155 notes
·
View notes
Note
sorry if you’ve answered something similar before but how do you format things for your website? in the collections you have for poems
i love how it looks. the book kind of format it has
and i want to do similar/the same formatting for my own works but im really struggling…
i've been asked stuff like this a lot and i don't mind explaining it often because i want people to make websites more. i made a tutorial video at some point but it's kind of hard to make a curriculum or tutorial or whatever around this kind of thing because it's really just a self expression thing. i'll try to break down as much of my thought process as makes sense.
i design my pages in photoshop with either double/single page display in mind and then i use html to set them next to each other. most of the choice here comes down to how overwhelming i want my designs to feel. in the case of the lonely leaver page, the entire book was designed to be something that could be a physical book, and so from the getgo i made the pages in that kind of format. i previewed things in acrobat which has a booklet view mode (which singles out the front and back cover around the contents of the file) & allows you to process double page view as well. as for the actual process in photoshop before that point, i typically will open a canvas that is the size of the full 2 page spread (i.e. 8 inches wide for 2 pages which are both 4 inches wide) and i set grid lines for bleed margins and to mark the center of the page so that i can make the composition something that im comfortable with having a gap in the middle from the book folding. with lonely leaver i had to reformat about half the book at some point because i wanted to make it a larger resolution which was annoying but i just keep my guidelines for a print size in mind while im working. often if im a certain amount of time into a project that i feel like i will be spending a lot more time with i'll create a dummy psd file at this point which is devoid of content but which has all of the margins/resolution stuff set up already so i can just open that up and save a different version of it when i'm done.
my actual writing process and my design process is generally extremely intertwined, that's why things tend to be varying degrees stream of conscious in my work i think. i'll for instance, have a thought im stuck on for several days, and then open photoshop without having a poem or comic in mind, but i'll fill the canvas with some kind of color like red or yellow or a photo or whatever, and then open a text box or start drawing. telling a story through composition (i.e. page layout itself) is generally my favorite aspect of art and design because i enjoy how violent and dramatic framing angles can make the content of a piece feel so i'll try to move stuff around as much as possible in order to get my desired effect, often times using place holder shapes in lieu of finished design elements in order to get a rough blocking. as i do this i tend to react to what i'm writing/making as i'm doing it, and i do a lot of selective self editing during this part. for instance, i'll start manipulating rasterized text or cutting around images or whatever. i'll reread and look at whatever im doing for a couple of hours and then when i'm done with a spread or whatever i will save the document as a psd with a combined full spread and then each page separately as pngs or whatever (split at the middle grid line, back to the example, i'll save 2 different 4 inch wide images by changing the canvas size).
when it's time for me to put stuff on my website i then batch convert whatever pngs i exported into webp's because they load faster and take up less space on the server/my computer. you can look at my direct html/css files in your internet browser's explorer mode to see exactly what i do but essentially i just have either 1 or 2 images in a block and then a series of repeating vertical blocks containing images. i don't have an extremely efficient way of uploading pages and i'll typically just copy the same
"<p><img src="01.png"> <p><img src="02.png">"
like, 30 or 40 times or whatever into a html document. i use visual studio code for this stuff because it lets me do a bunch of stuff like having several files open at once & the navigation pane is nice & there's a live server extension that automatically refereshes the html file in my web browser on file save which is really awesome. i have a css page that i made like, 5 years ago, and i usually just link new projects to that because it has a bunch of different settings in it which i'll toggle on or off depending on the needs of whatever page or i'll add new div id's to it. it's kind of messy at this point, but it gets the job done. i use filezilla and something like bluehost or something for webhosting/file management.
i arrange and organize all of my art extremely methodically so usually in my like "<root catch all poetry folder>" inside of my "<root catch all art folder>" there will be a "<name of specific poem book>" folder which just contains the poems named by their actual name e.g. "dedication to saint eulalia 4.png" and then another folder inside of that is called "paginated" where i, using the acrobat document i arrange stuff in as reference, rename copies of my pages which i have placed in that folder to be named things like "01.png" so that i can then manually flip through it sequentially in the windows photo viewer and also just so that i don't have to go through the arduous process of renaming and tracking stuff inside of the root folder i'm containing that project's files in.
i'm 26 now and i made my first website when i was like 18, and my first zine project and i'm tired of feeling feeling around that same time, so i've got like, coming up on a decade of trial and error behind this and this is generally what has worked for me. my website isn't super complicated and mostly just gets the job done but because i try to think about style and presentation up front with whatever projects i'm doing i tend to just make plans based around that as early as it makes sense. to me having a website for art presentation has always been the Primary Method and intended landing zone for my art so it's genuinely always been a consideration in my process to try to plan around how i will put it on my website. i do this because i believe having my own curated space for containing my art allows it to exist in a context which best heightens whatever message i'm trying to convey. if there's an issues with my website right now they are that i'm very bad at mobile browser formatting & i havent updated the main look of the website in something like 4 years barely at all.
anyway, at the end of the day i think really as long as you can identify whatever your intentions are and do some planning/problem solving around that you should probably be able to find your own method which works for you better than mine might but if you do just want to copy my website the tools to do so are within your brain and internet searches and i believe in you. i think the biggest strength of my website is that it shows how easy it is to just put art big as fuck on a webpage and how effective that kind of minimalism can be. i just want my website to be like a museum's walls. and it's not super complicated to get to that level of html knowledge.
11 notes
·
View notes
Text
StimuWrite 2.3 is here, please update your version!
I worked hard on this version to add a bunch of new features and improvements, the most exciting of which is the Addon System and Manage Themes & Addons panel! Previously, the only addons available where to add new language fonts, but that will change soon. I've already completed a couple addons that will be launching on itchio very shortly that you will be able to use to extended StimuWrite even further. The app should also be FASTER and more performant! If it's noticeable for you please let me know, I would love that.
The updates
New:
New Manage Themes & Addons panel allows users to delete individual themes and addons, this can be found in the Options menu. No more deleting everything to remove or reinstall one theme!
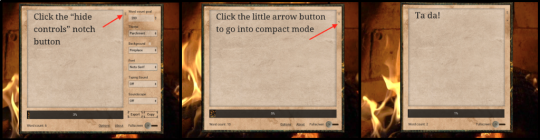
New compact mode that can be activated once the side panel is closed with the notch button next to the word count goal input
7 new heart colors added in Emoji Options, they go great with the free pride themes!
Addon system and menu bar. Addons coming! Once installed, you will be able to find them in a collapsed menu on the bottom left corner of the app (or the right if you have switched the emoji placement)
Improved:
Your work is automatically exported upon closing the program, if you've selected an export folder
Improvements to the custom emoji interface to make it more clear wtf is going on
Delete all settings and files button actually deletes everything and puts the themes and addons in system trash instead of permanently deleting them
Rich text export now exports HTML files instead of markdown files (just rename your txt files to get markdown files instead)
Lots of performance optimizations to make it FASTER! SNAPPIER! (please please please let me know if it's running better for you lol)
Bug fixes:
Multiple bugs fixed with unexpected custom/theme emoji behavior
Bug fixed where text was sometimes cut off when changing font or increasing it's size
Bug fixed where double dashes weren't being converted to em dash if typing middle of text
Bug fixed where words weren't being counted when typing in the middle of a document
Bug fixed where stimuwrite would accept gamepad inputs
How to enter "Compact Mode"
ICYMI: Free pride theme pack!
In case you missed it, last month I released a free theme pack with 8 colorful themes to celebrate pride! If you've ever wanted StimuWrite themes but haven't had the $$ to get some, this is a great opportunity. You can find it here: https://thatclowngoddess.itch.io/pride-theme-pack-for-stimuwrite
38 notes
·
View notes
Note
sorry i couldn't find out how to ask on your other blog.
that book binding you posted is gorgeous btw !!
I noticed that in one of the photos you included the disclaimer that you also edited it. I just had a question about how you formatted the text.
one of my biggest gripes with AO3 is text formatting (i often feel like i'm reading a legal document vs a novel/story) . Did you change how it is formatted on AO3 compared to printed?
I feel like i'm in the 0.5% that hate AO3 formatting but i thought i might as well ask in case you have any tips for that. >,>
(also how do you decide on the page size, do you just choose a standard size for all your projects? or do you vary it depending on what you are binding?)
thanks so much for taking the time to answer and for sharing your projects :) !!!!!!!!!!!
hey anon! I have asks turned off for the sideblog, but happy to answer here. Thanks very much!
I'm taking this opportunity to info-dump and link a lot of resources. I think they're useful for people new to either typesetting or bookbinding, but not all are directly related to your queries. That said, hope this is of use!
one of my biggest gripes with AO3 is text formatting (i often feel like i'm reading a legal document vs a novel/story) . Did you change how it is formatted on AO3 compared to printed?
I do a fair bit of editing when I'm binding a fic; typesetting is often the longest part of the process. Your mileage will vary depending on your experience with using word processor software, particularly the paragraph style and page style settings. Another factor is how simple/complicated you want your typeset to look. Replicating a published novel in format is difficult but learnable for a complete beginner.
I'm not equipped to give a full tutorial on how to typeset, but I'll point you towards some useful resources for ficbinding then talk about my own process.
ArmouredSuperHeavy has a tutorial on how to make Ao3's HTML downloads into a printable book in Microsoft Word. I use LibreOffice Writer myself, so this adaptation of the same tutorial is what I follow. Both are very helpful to reference as you're learning the typesetting ropes.
Personally, I don't mess around with HTML. I find it easiest to start by doing a Ctrl+A copy of the Entire Work fic view on Ao3 then pasting that into my word processor. This video tutorial by Beautifully Bound runs through how to do this in Microsoft Word using an AO3 fic as an example, including the associated steps needed to make the fic look novel-like. This is probably the best tutorial to address your gripe with AO3 formatting. Other than that, I'd recommend looking into videos or tutorials about typesetting novels for print. Same idea, and you may get more hits than searching for fanbind/ficbind typesetting tutorials.
More under the cut! Once I start yapping, it's hard to shut me up 🤷♀️
As a point of comparison, here's one of my fics on Ao3 and the corresponding typeset side by side:


Beautifully Bound explains this in far better detail than I will, but off the top of my head, the steps involved:
making a new document and setting the default page size to whatever size I want the book's pages to be (A5 or A6 usually). You can also set the margins at this point, taking account of your printer settings.
CTRL+A and copying the entire work's text on AO3 then pasting it into the document.
removing all hyperlinks and AO3 frontmatter, things like the author tags, summary, notes, etc as well as any website text that got copied over alongside the fic.
(optional) running a spell check and ensuring grammar usage is consistent. For me that's substituting em dashes for hyphens between clauses, enforcing curly double quotation marks for dialogue, etc. LibreOffice Writer automates a lot of this with customisable settings, via Tools -> Auto-Correct. Here's also where to make sure character names are all spelled right, convert the text to or from US to UK English, etc.
picking out fonts for the body text, headers, page numbers, etc. This is where you'll want to use paragraph style settings. Page style settings also comes in clutch if, for example, you'd like different headers on alternating pages. I like having the author on the right, the fic title on the left.
setting the body text first line indent to whatever makes sense visually). This in particular helps make the fic feel more like a novel. You can also play around with line spacing and space between paragraphs at this stage. For this A6 typeset, I had a 0.75cm first line indent, 1.15 line spacing, and 0.15 spacing between paragraphs.
(optional) formatting the first line of the work to use small capitals and to add a drop caps to the first letter of the first word. Again, this is a convention in publishing which add a novel-like feeling to a printed fanwork.
Inserting page numbers, adding images, coming up with how I wanted the "copyright" page to look—optional for the most part, but these are details that make a fic appear more like a novel.
For multi-chapter works, there's extra work in formatting chapter titles as headings so that they're referenced correctly in the automatic table of contents word processors can generate.
Once you have a typeset you're happy with, and if you're considering printing and binding it as a book, then you'll need to look into how to create and print signatures. Personally, this is something I had to actually try (and mess up a bunch of times) before I got to grips with it. Understanding how both your printer and your PDF reader work, particularly printer margins and booklet print settings, is key.
I won't go into as much detail on this, but if it's something you have an interest in, I'd recommend starting with DAS Bookbinding's tutorial. DAS has tutorials for everything bookbinding related so when in doubt, check his channel! Plenty of other YouTubers also have good videos on making signatures.
This resource is extremely useful once you've got your head around how to print signatures manually, so here's a link for anyone in that space: GitHub Bookbinding Imposer. Essentially, this does the signature creation for you, removing the need for booklet print settings in your PDF reader.
also how do you decide on the page size, do you just choose a standard size for all your projects? or do you vary it depending on what you are binding?
I have access to both A4 and A5 sized paper and my printer can handle printing on either size. In bookbinding, normally two pages are printed per side of the paper (which are then folded in half as part of a signature). That is, when I print on A4 paper, it's to make an A5 sized book. Printing on A5 paper will yield an A6 sized book.
Before I begin typesetting, I'll usually know what paper I plan to use, so the typeset will be one size down from the paper. So far, I've made softcover pamphlets at A6 size and casebound books in A5. No real method of choice for me, it's whatever I feel most suits the project.
---
If you made it this far anon, thanks for reading! Here's links to a few general resources if bookbinding is something you'd like to explore more:
DAS Bookbinding (YouTube, bookbinding in all forms)
Sea Lemon DIY (YouTube, bookbinding and other crafts)
bitter melon bindery (YouTube, bookbinding, particularly beginner friendly!)
Jess Less (YouTube, demonstrations of fanbinding and re-binding existing novels)
Papercraft Panda (blog, lots of detailed tutorial on bookbinding)
Renegade Bookbinding Guild (collective and website, loads of fanbinding-specific resources from their members and they have a helpful Discord).
24 notes
·
View notes
Text
If, like me, you've wanted a place to blog, but hate all the services and don't have the time or energy to mess with Neocities and the like---
try blot.im.
I wanted a place to host my original writing, but I didn't want to use Tumblr. I didn't want to use fictionpress or ao3, etc, and I really didn't want to have to convert everything to html every time I wanted to share a 500 word thing about my OC of the moment with someone. Blot fills all those needs.
Blot turns a folder into a website. You can sync it using Dropbox, git, or Google drive. It's been around for years and it's well documented. It's almost unheard of, for some reason, which is a damn shame. It can take a little bit of fiddling to set up how you want, but once it's done it's done. I post all my writing as raw Markdown files, with the only tweaks being to add some metadata to the beginning. It updates almost instantly. I've been using it for a few months now, and it's been a really good experience. From what I can tell there is also no moratorium on using it to host (legal) nsfw content.
Blot costs $5 a month, but you can self-host it if that's in your wheelhouse. You get a subdomain.blot.im url by default, but you can also use your own. Mine is at heycorgi.com. The site is a little messy but you can see it functioning, and there's a lot if you Google for people's blot.im blogs.
I don't get anything out of spreading this, I don't have a referral code or anything. I just think it's a really good tool. (It would be cool if it got bigger, though, mostly with the hope that more resources and themes for it might arise. There's a startling lack of themes.)
Start a blog! Tell a friend!
19 notes
·
View notes
Text
I was at the library yesterday, which is now my go-to for distractionless work; I uploaded Dinner At The Palace with a few last edits so it's ready to go in print and epub, wrote all the sales copy, and updated my website with "coming soon" announcements. Wordpress really is just the worst; I can code what I want in about a third of the time it takes to tell Wordpress what I want and even then it fucks it up. It's like working with Word if it were designed by a toddler who hates me, personally. I'm building a new site on another platform, which is not much better but does allow me to copy, paste, or delete a block of text by selecting said text, something Wordpress's feeble grasp on structure is still grappling with. As we have daily proof. *gestures at Tumblr*
Anyway, I've been thinking about overhauling the older novels, standardizing them into the style guide I've developed. So I dug out all the upload files for Nameless, my first novel, and cracked them open just to see what kind of work it would take.
The document file for Nameless is so old that Windows wasn't sure how to open it. I mean it was just a .doc file and Windows likes to give you options when it's not a .docx, but I was still amused that I had to tell it how to get into the Ancient Tome. This was also before ebooks were as big as they are now, especially in indy publishing; these days you can just upload a word document and Lulu will convert it, but back in 2009 I had to create an HTML file of my novel to get it converted to ePub. Wild.
The bad news is that my early documents for my first few novels are a brutal mess, but the good news is that because I was less sophisticated in terms of how to typeset, they're also very simple and easy to upgrade, and even back then I was saving the covers as psd files, so it's all editable. I'd rather finish Royals/Ramblers than work over all my old manuscripts, but they're a nice break when I'm tired of other work.
Now I just have to determine if I have the emotional stability to re-read Nameless. It was a very personal novel to me, but it was also published almost 15 years ago, and I'm a little concerned about being able to read my deathless 2009 prose without wincing. I tell myself we all learn and grow, and Christopher and Lucas aren't real and won't suffer if I wrote them poorly, but I'm still bracing myself for all that.
125 notes
·
View notes
Text
for anyone who wants to start using Obsidian for writing/plotting, here are some useful plugins I recommend:
Continuous Mode -> to open all the notes in a tab group as if they are a continuous scrollable document ("Scrivenings mode").
Date Inserter -> insert a date using a calendar.
Dictionary -> only English (US & UK), Hindi, Spanish, French, Japanese, Russian, German, Italian, Korean, Brazilian Portuguese, Arabic, Turkish, Chinese.
Edit History -> automatically saves the history of edits of a file.
Editing Toolbar -> more powerful text customization settings; MS Word-like toolbar.
Importer -> to import data from Notion, Evernote, Apple Notes, MS OneNote, Google Keep, Bear, Roam, and HTML files.
Local Backup -> automatically creates a local backup of your vault (Obsidian is local only).
LongForm -> to write long projects; lets you organize a series of notes and scenes, but it's useful even for shorter projects.
Novel word count -> display word count, page count, reading time, character count, note count & much more.
Omnisearch -> a search engine for your notes; better than the default one.
Remember cursor position -> for each note, so it makes it easier to switch between notes, move from a link to another, etc.
Smart Typography -> converts typographical symbols and punctuation marks to the correct ones as you type.
Timeline -> create and manage visual timelines.
Trash Explorer -> restore and delete files from the Obsidian .trash folder.
then just for aesthetic:
Beautitab -> create a customizable new tab view.
Style Settings -> allows css files to customize Obsidian or notes.
5 notes
·
View notes
Text
Really wish there was a standard format for local responsive documents. PDF is great for static documents, but what if I want to send someone something that'll look good on phones as well? HTML would seem to be the obvious choice for responsive documents that every device has a viewer for, but I haven't worked out a way to get local HTML sites to display properly on my phone – Neither Chrome nor Firefox recognise file:// URIs, Chrome doesn't display images or styling when opening from the file manager, and Firefox doesn't even show up there in the first place – so they're out too I guess.
It seems like you either have to drop responsivity (PDF) or portability (HTML), I can't see a way to have both. The other options that came to mind were ePub (which doesn't do styles) or Markdown (which you would convert to HTML if you wanted consistent styling anyway), and neither of which have anywhere close to the universality of PDF and HTML.
The last resort option would be making two PDFs, one at regular A4 page size and one designed with a page as wide as an average phone screen, but that seems annoying both to produce and also for the users.
[Repost from a few days ago on my Cohost]
8 notes
·
View notes
Text
advent of code 2023 day 1
so for the record i'm being pretty casual about this, i have stuff going on this month + my health is wonky as usual so i may not actually be doing this everyday, might do puzzles late, etc
anyway! i'm still a bit of a novice i think, but i decided i would try out this advent of code thing, seemed fun. i'm using html/javascript since that's what i have any experience in right now.
my solutions below the cut so you aren't spoiled if you want to do it yourself!
i decided to keep my part 1 and part 2 solutions separated, they're on the same document. i have some really basic HTML that looks like this:
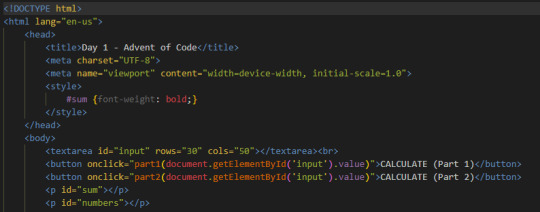
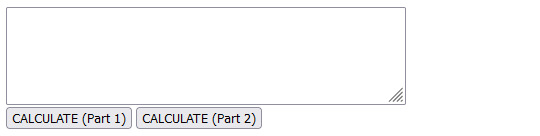
and this was my solution for part 1 before words got involved:

for the record i have taught myself basic RegEx multiple times, and every time i forget nearly everything, so most of my time spent on this solution was refreshing myself on a little bit of RegEx. i think this is pretty straightforward - split the input by line, then loop through each line and remove anything that isn't a number, then take the first and last digit in each of the remaining strings, add them all together for the result.
the solution for part 2 on the other hand:
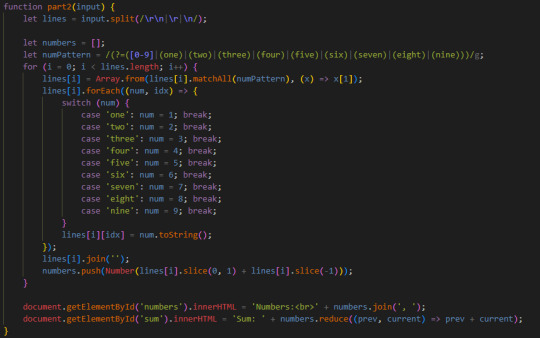
i actually found this somewhat frustrating because the problem itself didn't clearly explain whether something like "eightwothree" in the provided example should be "8 2 3" or "8 3"... my original solution disregarded overlapping words like that. this caused issues because if you had something like... i don't know, threeeightwo, my program would make the resulting two digit number 38 instead of 32, resulting in a wrong sum when adding all of them together.
once i realized the issue i was a bit stumped on how to deal with this and get the overlapping words to be included. i knew that i could manually loop through each position in the string, looking for any of the nine digits in either their letter or numeric form, and when it finds a result, push it to an array of results or whatever, but i really didn't want to do that because it would be unnecessarily bulky in my opinion. and i wanted to keep experimenting with RegEx instead. so after some googling i landed on amending the numPattern and changing
lines[i] = lines[i].match(numPattern);
to
lines[i] = Array.from(lines[i].matchAll(numPattern), (x) => x[1]);
and while it works great, i admittedly don't fully understand it. like, conceptually i get its intention and the end result it spits out, but i wish i understood what was happening under the hood with .matchAll() better. i tried to wrap my brain around it, but i'm too hungry and too sick feeling to properly teach myself right now, so i've decided to drop it and if it's still itching at me later, i'll come back when i feel better to understand it.
anyway, after that, still pretty straightforward - once it's taken out all of the numbers in both numeric and written format, it loops through the results and converts the words to digits, then joins all the digits together, then does the same thing as before with slicing off the first and last digit to make two digit numbers and adding them all together at the end with .reduce().
15 notes
·
View notes
Text
online resources for school! ꒱ ࿐ ࿔*:・゚

resoomer.com –> summarizes the text (you can set your native language)
wordcount.com –> counts words in document
speechinminutes.com –> counts how long it will take to read the prepared text (you can also set whether you speak slowly, quickly or normally)
essaytopicgenerator.com –> generates the topic of the essay based on keywords (the field or type of essay can also be included)
researchgate.net –> free texts that can be referred to in the essay
academia.edu –> free texts that can be referred to in the essay
Google Drive / Microsoft OneDrive and Office365 –> free cloud with tools to make slides, documents etc.
sites.google.com –> make free, simple website without any skills
carrd.co –> make free, simple and pretty website without any skills (max. 100 elements)
Online converters –> change file type to different file type
icons8.com –> free icons (for slides, sites etc.)
remove.bg –> remove background from photo
loader.to –> download YouTube video or playlist as video or sound files
forms.google.com –> make simple form/poll/quiz/etc.
quizlet.com –> make flashcards and test yourself (some things are only in pro version now)
Streaming services –> documentary films, educational podcasts etc.
artsandculture.google.com –> explore art, online museum tours etc.
plantsnap.com –> recognizes plants and mushrooms
ecosia.org –> web browser, but they plant trees when you use it
tunemymusic.com –> transfers music playlist (or text song list) to another service
shazam.com –> recognizes songs
slidesgo.com –> slides templates
thesaurus.com –> finds synonyms (you can easily find similar websites in your native language)
Apple reminders, google calendar etc. –> help organize
Online libraries –> free books
html-online.com –> write html, css and javascript online
supercook.com –> shows recipes with things you have at home
edx.org –> free courses
academicearth.org –> free courses
© anqelicdiary
4 notes
·
View notes
Text
Scary ao3 posting script times
The ao3 posting script - which to me is one of the most vital documents that exists on the planet - appears to no longer have the 'post to ao3' button option...?!!! Or is this some sort of glitch unique to my browser/drive? (Although I've tried it on different browsers?!!!!)
The images below show without button and with button.

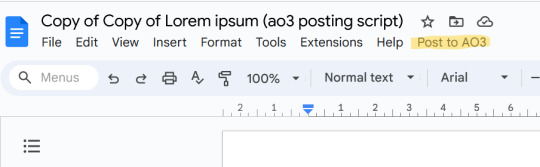
Over the past three weeks, I've been able to use an old copy saved to my drive that still has the function, and I've kept an eye on the original doc to see if the button returns. Alas, it has not. I'm worried that eventually my copy could load without it (I just experiemented by making another copy of the version with the button, and the 'post to ao3' button didn't appear...
I'm wondering if anyone else is experiencing this issue when they load the document, or if you use some other failsafe method for converting regular text to html for ao3's formatting? I'd love to know what it is.
Or, at the risk of sounding like a luddite: does anyone know how to make the button appear if it doesn't load automatically?
I am quaking in my slippers.
5 notes
·
View notes